Saturday, February 26, 2011

More Inspiration

Since the current challenge is "Anything But a Card"  here is some more inspiration for you.  Some of these are using the diecuts from Creative Cuts and More.  They are so easy to work with and are of great quality.
Barbara
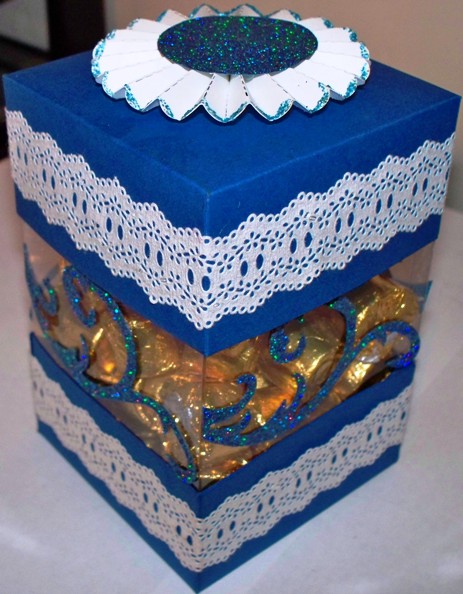
My second box is called a Peek-a-View box. It comes with a top, a bottom and an acetate sleeve for the center. I assembled the parts and put the box together. I wrapped paper lace around the top and bottom sections. I die cut 4 flourishes from glittery paper and adhered a flourish to each of the acetate sides. On the top I placed a rosette with a center to match the flourishes. It makes a great candy box, don't you think?

Krisha


The second picture show the basic diecut from Creative Cuts and More.  It is from that diecut I made my box.The flowers are grunge flowers I made to match the colors I was using. The leaves are silk ( can't claim those LOL) The sentiment is from Hero Arts. The sides were also sent from Creative Cuts and More, I just ran them through the embosser, then embossed with some extra thick embossing powder in spots and tinted the tiles with purple ink. The top is attached to the bottom with a brad and glue to make the pede.
Vicki
This time I made a collage coaster.  I'm afraid it did not scan very wel.  I started with a striped piece of  designer paper.  Then I added a second piece of designer paper.  I used some sequin waste on the background and on it I placed an image from Alpha Stamps.  The greeting was from them also.  The added embellishment was a piece of chipboard in the shape of a heart.  On top of it is a flower highlighted with a stone.

This is the first of four coasters that I am doing for a Gingersnp Creations swap.  I am also entering this in Simon Stamp and Show challenge "Stripes".

Thursday, February 24, 2011

Stampotique Designer's Challenge

I know everyone loves free stuff - and this is your chance for great prizes!  Pat Huntoon's Technique Junkie Design Team is participating this week in the Stampotique Designer's Challenge. One lucky participant will win a Two-Year subscription to the Technique Junkie Newsletter (on-line only) and a Fancy Folds and Motion CD. The other winner will receive a $30 gift certificate to use on the Stampotique Store. Instructions for participation are below.

Here are your rules for participation:

1. For this challenge, use Stampotique Stamps only.
2. You must use either the Faux Barnwood Technique or another Technique Junkie technique of your choice, and state which one you used in your post.
3. On the Stampotique Designer's Challenge blog, you must link directly to your challenge post, not to your general blog.
4. The contest will close on March 8, 2011, at 5 PM EST.
5. Have fun and show us what you can do!

Both of my samples use Faux Barnwood as the background.  It is just two different colors.  All stamps are by Stampotique and coloring was done with Copics.

Wednesday, February 23, 2011

Compendium of Curiosities #33

I haven't joined in on Studio L3's Compendium of Curiosities recently.  This week it is on Altered Metal Alcohol Inks.  This was a fun technique.  I altered my metal piece with a red alcohol ink to match my paper.    This card has various layers of different shades of rose to burgundy.  I really like the way my metal embellsihment turned out.

I used as my main image two very small playing cards, the king and queen of diamonds.  This is being entered into Gingersnaps Creations' "King and Queen" challenge.

Tuesday, February 22, 2011

A Winner and An Arch

Congratulations to Pankti.  She was No. 10 of the entries and that is the number the random generator picked.  Her card was posted in the winner's spot on my sidebar.  If I don't post a special post announcing the winner of my challenges, you can always find who it is there.

Now for my post.  I am entering the "Butterflies" challenge on Gothic Arches.  I don't usually like to use stickers, but these lovely ones were given to me by a secret pal.  i reallyt like the gold trim as it makes them really pop.  As a special touch I added a glass fragment with a butterfly in it.  The stamping is by Stampin' Up.  I picked a very dull paper and stamped with Autumm Brown as I wanted the butterlies draw your attention.

Sunday, February 20, 2011

Challenge #11 - Colors: Red and White

I am so excited that so many of you entered my last challenge.  The winner will be announced either late Monday or Tuesday morning.  The winner will be picked by a random generator.  Hopefully if you did not win that you will come back for this challenge and future challenges.

Challenge #11 continues with an aspect of what we think about when we think of February.  It is "Colors: Red and White".  The entries to this challenge should emphasizes the colors red and white.  You may use additional colors, but it is the red and white that should draw your attention.  The entries really should not be Valentines as that was the last challenge.  Again, I will use the random generator to pick the winner of the prize.  Using this method gives equal chance not only advance stampers, but beginners as well.

I am pleased to announce that this challenge is being sponsored by Scrolls Work stamps.  Jacque at
Scrolls Works has given a couple of stamps for the winner to use on her next project.
Here are some cards to to inspire you.
Vicki
This card uses a couple of stamps from Scrolls Work. The background illustrates the Millieflori technique which is in the February / March Technique Junkies Newsletter.  Coloring was done with Copics.  The red lace was made with a Martha Stewart punch.
Barbara
The challenge theme this week is red and white, but not a Valentine. I decided to go green with this card. How does green turn into red and white? Easy. When you die cut images or shapes there are often left over pieces that you do not use. The background frames were left when I used the shape and the middle shape was left when I cut the shape out of a card front. They fit together perfectly to make the background of my card. I used a frame embossing folder to decorate the corners. As for the bird, the Tim Holtz' die contains a bird and a birdcage. I used the birdcage elsewhere and kept the bird. The gold lacy panel was just left over when I changed my mind. I think the pieces worked well to create my card. All I needed to add was the card base and the sentiment key which says "Joy". (In real life, the red of the bird and the red of the paper are closer in color. I don't know what happened with the scan.)


Tuesday, February 15, 2011

Wah La! It is Oh La La!

Here is my entry for the Bella Creations Oh La La tag.  We were to use a rabbit digital and create a bookmark.  Usually you see the man or girl pulling a rabbit out of the hat.  This time the table is turned.  The rabbit is pulling the girl out of the hat.  It's a little busy, but so are magic shows.

Thursday, February 10, 2011

A Curled Corner

Here is another card to inspire you.  The present challenge is "Colors:  Red and White".  This challenge is to get you to create a card. tag, etc. that is not a Valentine.  Therefore, put on your thinking cap and see what you can make.
The images and verse on this card are from Sweet and Sassy.  At first I colored the beautiful butterfly, but decided to redo as I thought the white accented the card more.  The special thing about this card is that it has a curled corner.  Since this paper did not come printed double-sided, I cut two backgrounds and glued them together.  I was afriad the scanner would mash my curl, but it didn't seem to mash it much as it shows in the pic still rounded.

As you see, you can use red and white and still not be limited to making a Valentine.

The current challenge?  "Colors:  Red and White" sponsored by Scrolls Work Stamps.  It is announced in the post above.

Tuesday, February 8, 2011

Winner of Challenge #10

Winner of Challenge #10 Be My Valentine is #55 Kendra Sand.  She was picked by random generator.  Thanks to everyone who entered the challenge.  Hopefully you will return and take part in my present challenge which is "Colors:  Red and White".

Monday, February 7, 2011

Red and White Tag

Here is a quick tag I made as a non-valentine Red and White sample.  Hope you like it.  I used the millieflori paper for the flower.  I think it makes a very cheerful-looking addition to the tag.  The bird and greeting are by Hero Arts.

Sunday, February 6, 2011

Challenge #10- Be My Valentine

 In a couple of days is February.  That is the month for love and lovers.   Therefore, Challenge #10 is "Be My Valentine".  Your creation can be anything pertaining to love and lovers.  The challenge will end at midnight Sunday, February 6.

Here are a couple of posts that might give you some inspiration.

Krisha
Stamp is from Rubber Stampede, and the die cuts are from K&Co. Bits and pieces of lace from my stash and some floral paper brought it all together

Barbara
Can you believe that Valentine's Day is just around the corner. I thought that this would be a fun image for a Valentine's Day card. Around the image I used paper lace tape. The background is Core'dinations paper which has been dry embossed using a Cuttlebug folder and then sanded. The sentiment was printed on my Dymo printer using the open font. I then used a marker to colorize it. I love the vintage look of this card.
Vicki
My tag is one I created for  the Oh La La group of Bella Creations.  It uses the group's Avatar.  I cut the image with a Spellbinders cutter and paper pieced the bouquet of flowers that the man is holding.  As an additional embellishment I placed a flower in the corner of the tag.  I use a rub-on to place the word "Together".  For the final bit of embellishment I attached two pieces of my favorite lace trim.

The random generator will pick the winner again for this challenge.  The prize?  It is valued at $17.95!
It is the Technique Junkies  Fancy Folds and Motion Paper Crafts CD. 
You will not regret being the winner of this CD as it is wonderful.  There are so many outstanding  techniques on it

Wednesday, February 2, 2011

A Little More Inspiration

Here is a little Valentine sick card I made for a friend.  I decided to use the scrap black and white paper I had left over from the tag I previously made.

 The Love Bug stamp is from Hampton Arts.  The lace was made by using a border punch on a strip of paper and then turning it over and punchng on the other side.  The heart is double layered.  The bottom layer is a piece of shinny. cardstock and on top that heart it has a shinny heart with florescent designs in it.  This card really does not reveal any technique in particular.

Below are two cards made by Krisha..
Krisha
This is the first time I have ever used a digital image and I am ashamed to say I don't know where it is from, but I fell in love with it. She is colored with pencil and marker, then trimmed. I layered her onto an oval that had been dry embossed then inked and embossed with red embossing powder. That oval went onto a white, slightly larger oval, then onto some red hand made paper, and tied it off with a red w/ polka dot ribbon. I did run the card through the dry embosser for a texture on the front of the card itself

Tuesday, February 1, 2011

February - The Month of Love

Here is my latest Valentine.  This time it is a tag.  You know, you don't have to make your Valentine red or pink and white.  I decided to do this valentine tag in black and white with a splash of purple so I could enter Play Date Cafe's Challenge 66 this week.

The tag uses an image from Stampotique.  The coloring is done with Copic markers.  The words are those of the image made with stickers.  I used out of the box and level up techniques.  The large flower has two levels to give it a 3D effect.  The close-up picture is a little fuzzy because of the 3D flower when it was scanned.

The gal knows her guy loves her as he has given her flowers even though he probably picked them from the roadside.